Hello everyone! I've got some exciting news to share. I started working {part-time} at Creative Bag this fall and they recently asked me to be a guest blogger for them. I'm thrilled to be able to share my packaging and wedding themed projects on their blog and I hope that you will pop over and visit me there too! There will be project ideas, tutorials, lots of inspiration and the occasion {free} download! My first blog post should be up by the end of the week.
So let's get started with one of my favourite ways to "wrap up" a gift using a clear tin pail ...

Creative Bag has a great selection of tin containers. There are so many different shapes and sizes available that the hardest part is figuring out which one to use. For this project, you will need a 3"x 4" clear tin pail - a gift card fits perfectly inside this size. I used a patterned paper inside the pail to decorate the container and to hide the gift.

The pattern paper is actually something that I created to fit the 3"x4" pail and to share with you. You can download my pdf file by simply clicking on the link under the picture. Please note that the art is for personal use only and cannot be used for commercial use.
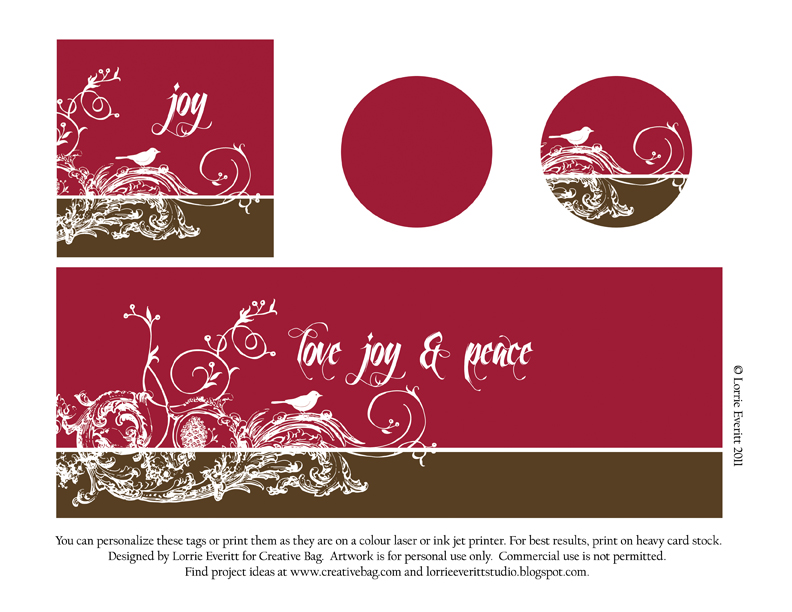
You can personalize the my pdf file with your own message in any graphic design software. I've included a second version to download with the words "love, joy and peace" for those of you that would like a generic holiday message.

Here's what you will need for this project: a 3"x4" clear tin pail, assorted ribbons, some clear rhinestone stickers, scissors, single hole punch, scotch tape, two-sided tape, a piece of twine and of course, my download. The first thing you need to do is print the pdf file on a colour inkjet or laser printer on a heavy white cardstock.

The next step is to cut out the rectangular band and two circles. You will not need the square tag for this project but hang onto it for another day. Cutting Tip: I like to use a paper cutter to cut straight edges but if you don't have one, scissors work fine too.
The easiest way to insert the paper band into the pail is to roll it first and let it open up inside the container. You can gently twirl the paper around until the design is positioned where you want. I like things to stay in place so at this point I added a tiny piece of tape to the inside of the paper band.

Now we will add the paper circle with the bird design to the tin top. Here's where you can get a little creative by adding a couple of small clear rhinestones to the design. The next step is to add a few pieces of two-sided tape to the back of the paper circle, peel the adhesive tabs off the tape and position the paper in the centre of the tin top.

I like to tie lots of assorted ribbons to the pail handle. I select my ribbon colours based on the colours in the papers and the metal colour of the tin (in this case: red, white, brown and silver) and I always mix ribbon textures (organza, satin, gross grain). Cut the ribbons so that they are about 6 to 7 inches long. You will also need a 9" piece of twine.

You may have noticed a small washer attached to the handle of your pail. I hope that you didn't cut it off and forget where you put it. That little washer is used to open the lid of your pail if you haven't already figured that out. We will attach it to the handle of the pail first so that it will hang the down the lowest - it should be long enough to easily reach the lid when attached.

Now the fun begins, simply tie the ribbons to the handle - there is no right or wrong way to do this so just start tying! I don't find that it is necessary to knot the ribbons - I just tie once!

Once you have all of the ribbons on the handle, group them together on one side. This will help the handle to stand up. At this point you should trim the ends of all of the ribbons .. angle, straight ... whatever you like.

The last thing that you will want to do is add the plain red circle tag. You will have to add a hole with a hole punch and finish with a thin ribbon for hanging. It is best to write on the tag before you tie the tag onto the handle. I will often make a bunch of these containers and leave the tag inside until I am ready to add the gift.

Here's another picture of this project using the second download with the "love, joy and peace" message. Just remember you can add your own message to the plain design ... for example: "happy holidays from the {your} family" ... using your favourite graphic software program.
I love these containers because nobody throws them out ... they are either re-gifted or reused as storage containers.

And here's one more picture of this project using scrapbooking or wrapping papers instead of my download. You can add lots of other elements to decorate the container such burlap ribbon and snowflakes (all available at Creative Bag). I'll do another post in a couple of days showing you how to decorate these clear tin containers with patterned papers so that you can recreate this project anytime of the year ... think birthday parties, wedding favors, teacher's gifts!
I hope that you will check back here for more holiday inspiration in the next few weeks. And if you get a chance to pop over to Creative Bag ... come back here and leave me a comment. I'd love to hear your comments.
I am working with Creative Bag's Wedding division (I'm smiling right now) and I am so excited about some of the new product lines that we will have in stock over the next few months. Check out my wedding board on pinterest and you'll see how much I am in love with all things wedding right now!!
I hope you have a happy {creative} day!